
Overview of the template editor
Requirements
- You need a role with the privilege to update templates.
- The editor is currently not optimized for mobile devices. Use it on a desktop computer.
Steps
Opening the editor
- Go to Templates in the sidebar.
- Click the Edit Template icon with the pencil on a template. Or open the details page of the template and click Edit Template there.
Layout
The editor has three areas.
- The section menu on the left. Every part of the template is a section. Each menu entry shows a validation icon. A green check means valid, a yellow triangle a warning, a red X an error and a dashed icon an unsaved section. Hover the icon to see the messages. A Changes list under the menu shows which properties you have modified.
- The section form in the middle. It holds the settings of the selected section.
- The interactive pass preview on the right. It shows the front and the back of the pass and updates live. Click an element in the preview and the editor jumps to the matching section.
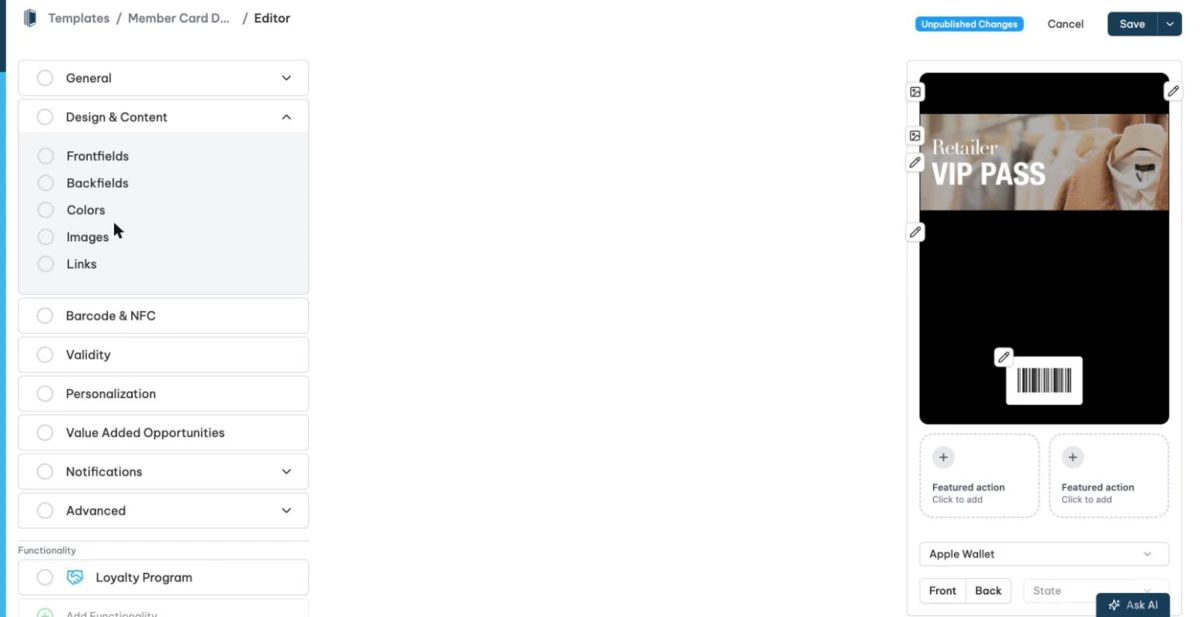
Sections at a glance
- General holds Pass Info, Wallet App and Pass Type.
- Design & Content holds Frontfields, Backfields, Colors, Images and Links. See Pass fields on the front and back and Colors, images and links.
- Barcode & NFC holds the barcode and NFC settings. See Barcodes.
- Validity holds the expiration settings. See Validity, welcome push, locations and relevant date.
- Personalization holds the additional properties. See Personalization and additional properties.
- Value Added Opportunities holds special offers that Google Wallet shows.
- Notifications holds Welcome Notification, Locations and Relevant Date.
- Advanced holds Linked Apps, Sharing, Beacons, Localization and Semantic Tags. See Advanced options.
- Add Functionality adds one functionality to the template. You choose between Valid once per day, Loyalty Program, Stamp Card, Prepaid Card and Variants. A template has at most one functionality. It appears as its own menu section, and Delete functionality removes it again. You cannot undo the removal. See Pass functionalities.
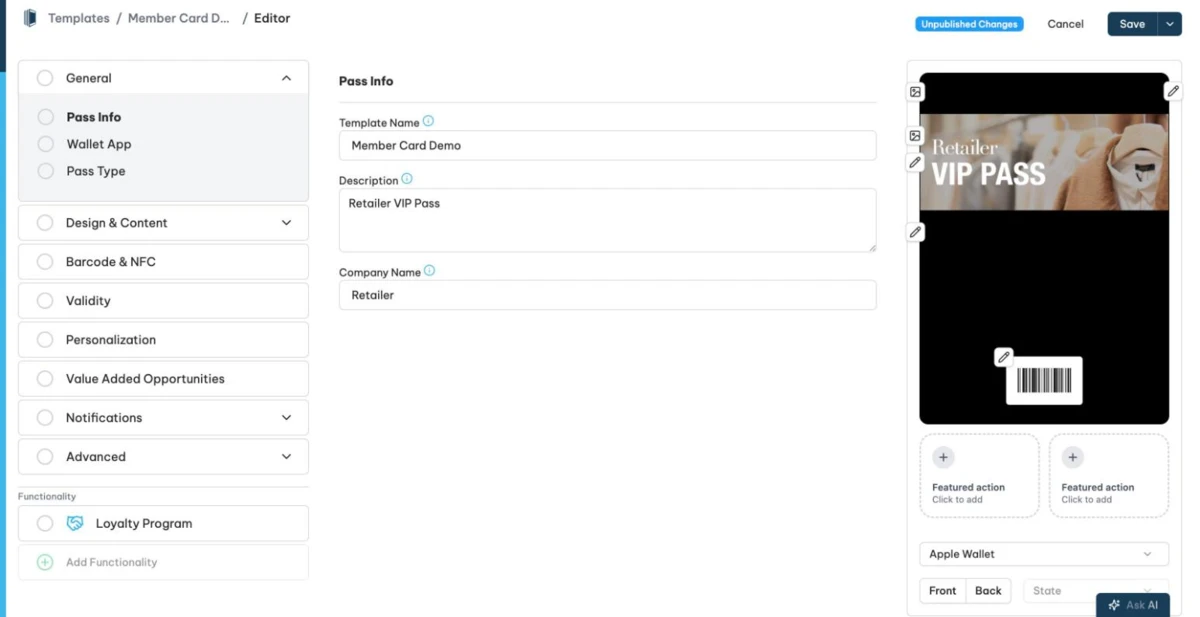
Pass Info
The Pass Info section holds the Template Name, the Description and the Company Name, which is the name of your organization. The template name identifies the template and appears in email attachments. iOS accessibility uses the description. The organization name appears in email attachments and push notifications. You translate the name and the description per language. The organization name deliberately has no translation, because iOS ignores localized organization names.
Pass Info also contains the Localization block. Pick a Default Language and use Add Language to support up to 40 languages. See Pass languages and localization.
Pass Type
The Pass Type section offers six tiles, Coupon, Store Card, the classic Event Ticket, the Event Ticket with a full size background image, Generic and Boarding Pass. Badges on each tile show which type each wallet app uses. The pass type determines the layout, the number of fields and the available image slots.
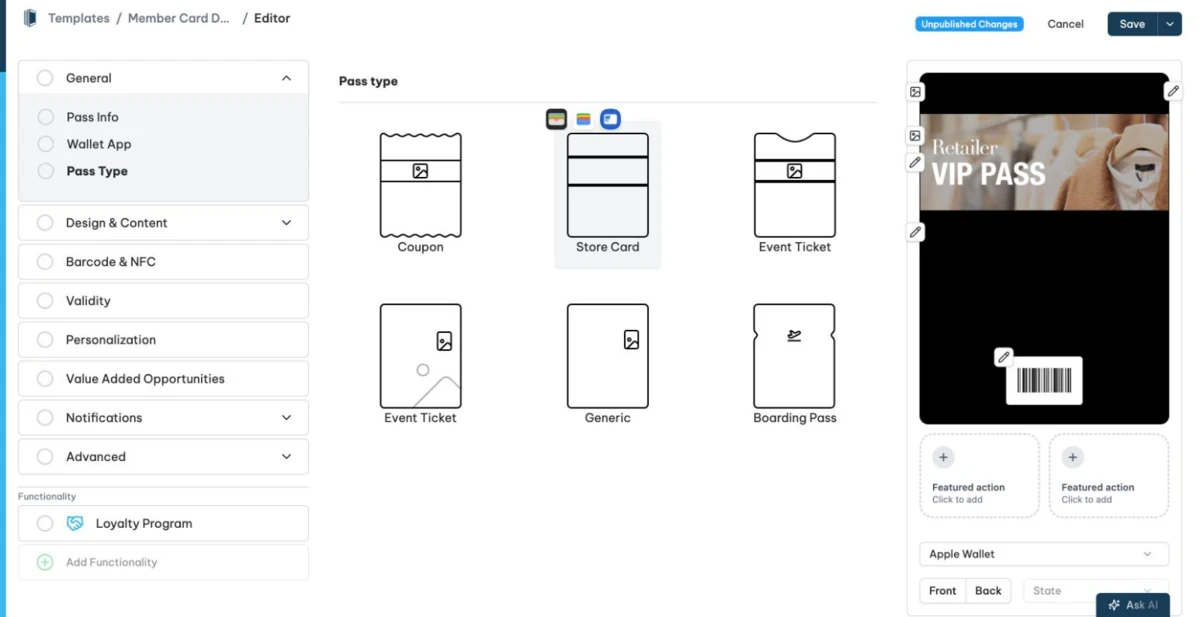
Some types offer an Enhanced Pass Type toggle. One example is the poster event ticket layout with header darkening control, footer background color and additional info fields. Another is the poster generic layout, which requires iOS 27. When you enable a toggle, the editor lists any missing requirements.
Saving, drafts and validation
The header shows the status of the template as Unsaved Changes for local edits, Unpublished Changes for a saved draft or Live Version. When you click Save, the editor validates all sections first. Fix errors before you save. Warnings appear in the Validation Issues panel, and you accept them with Save Anyway.
Saving creates a draft. Your customers keep seeing the live version until you publish. The Save button also offers Reset Unpublished Changes, which discards the draft and returns the editor to the current live version. If you leave the page with unsaved changes, the editor asks for confirmation.
To make a draft live, publish it. See Publishing changes and template versions.
Checked 2026-08-20 · Documentation