
How certificates work
What certificates do
Technically, certificates serve two purposes.
- Signing the Wallet passes themselves. The signature lets the Wallet app check the integrity of the pass files and confirm that the issuer has permission to issue passes.
- Encrypting connections to the Apple Push Notification Service, APNS. This lets Apple decide whether to send a push notification at all and tells Apple which pass needs an update.
Each certificate belongs to a Pass Type ID that you create in the Apple Developer Portal, for example pass.com.example.loyalty. In Passcreator, every template belongs to one certificate.
What pass holders see
Apple Wallet groups passes by certificate
Apple Wallet groups passes that share a certificate. It shows them next to each other instead of on top of each other. This helps when, for example, a holder has multiple vouchers for the same store. They find them all in one place.
Passes that share a certificate share their push notification icon
If several passes use the same certificate, push notifications always use the icon of the first pass the holder saved on the phone. Be careful when you distribute passes with different icons under one certificate. The notifications for later passes still show the icon of the first pass.
When to use a new certificate
Create a new certificate whenever a pass has its very own purpose. For example, it belongs to a completely different enterprise or needs a different icon in notifications.
Certificates in Passcreator
Open the profile menu at the bottom of the sidebar and go to Settings › Certificates. Passcreator shows each certificate as a card with these details.
- A validity icon, green when valid and red when expired, and the certificate name.
- An NFC active indicator when the certificate supports NFC.
- Badges such as Samsung for Samsung Wallet certificates or Managed by Passcreator for certificates from the NFC approval process. Passcreator restricts the latter to specific templates, and you cannot update or delete them.
- The Valid since and Valid until dates.
- The Team Identifier and Pass Type ID. Samsung certificates show Partner ID and Certificate ID instead.
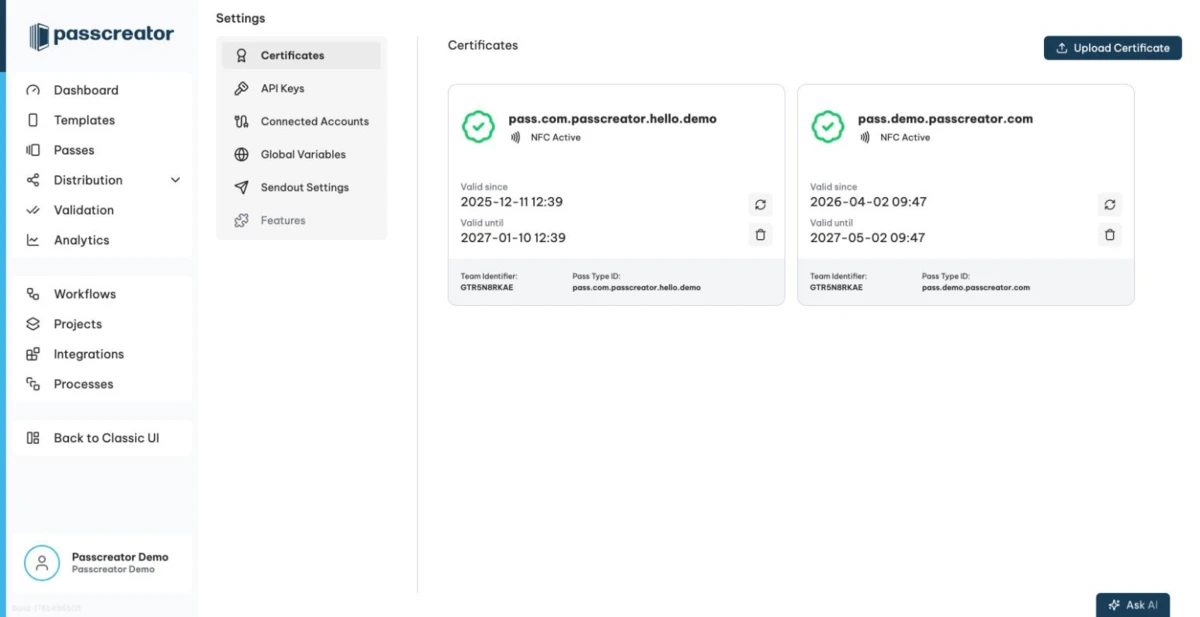
From here you add a certificate, and each card offers Update Certificate and Delete Certificate. You cannot delete a certificate that templates use.
You assign a template to a certificate when you create it, in step 2 of the New Template wizard. You change the assignment under Template Details › Settings › Certificate, but only as long as nobody has downloaded a pass. Changing the certificate changes the Pass Type ID, so Passcreator can no longer update passes that holders already downloaded. Passcreator warns you or blocks the change accordingly.
Demo certificates
If you do not have an Apple Developer account yet, start with a demo certificate from Passcreator. Templates with a demo certificate carry a Demo badge in the templates list and allow up to 30 passes. Use them for testing only and switch to your own certificate before going live. Customer administrators enforce this with the Prevent usage of demo certificates setting under Account › Security › Certificates.
What happens when a certificate expires
When a certificate has expired, holders can no longer save passes signed with it, and you can no longer deliver push notifications to existing passes. Passcreator notifies you by email before a certificate expires. The templates list shows the badge Certificate expiring soon at 30 days or less remaining and Certificate expired afterwards. Renew the certificate in time. See Renewing a certificate.
Next step
Continue withCreating a certificateChecked 2026-08-20 · Documentation