
Your own sender address and SMTP
Requirements
- You need the sendout create privilege to see the sendout settings.
- Sending from your own address with White Label Mail and using your own SMTP server are optional add ons. Contact Passcreator if you don't see these options.
Steps
Opening the sendout settings
- Open the profile menu at the bottom of the sidebar and go to Settings.
- Select the Sendout Settings tab.
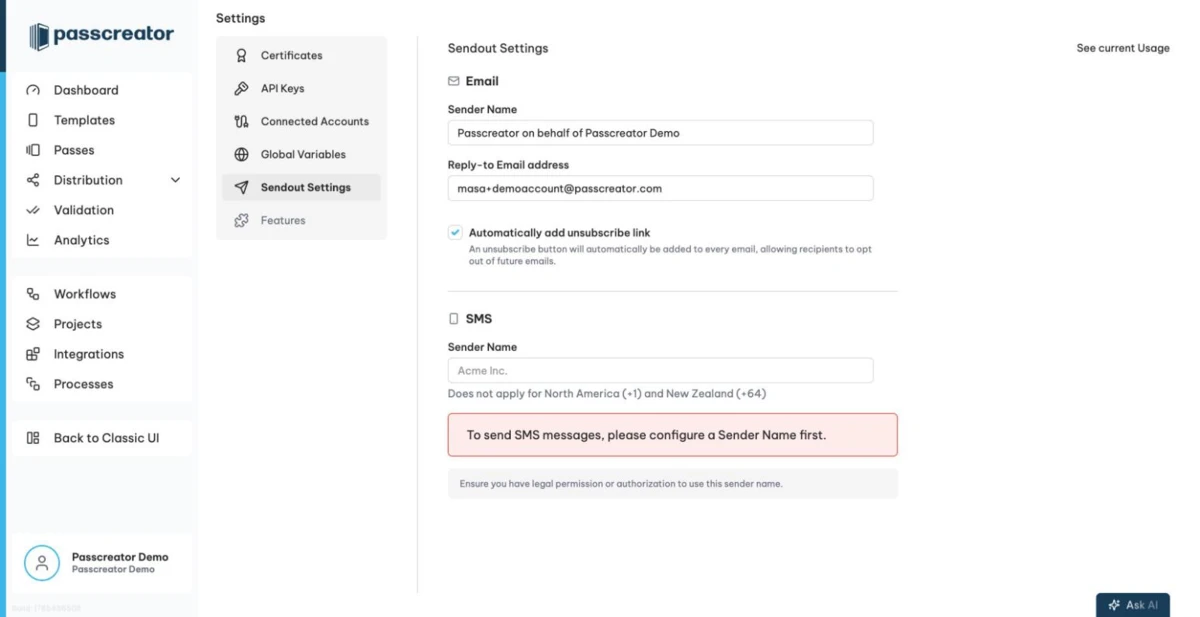
If the Sendout extension is not active yet, the page shows the form blurred with an Activate Sendout Extension button. Only account administrators with a valid payment method can activate it. During activation you confirm the legal use of your sender name and the message costs. Passcreator bills each email at €0.0005 and each SMS at €0.03 per message sent. The See current Usage link takes you to your subscription page.
Changes on this page save automatically about a second after you stop typing.
Email settings
- Sender Name is the default sender name for your emails. Passcreator prefills it into new sendouts.
Reply-to Email addressis where replies from recipients go.- Automatically add unsubscribe link adds an unsubscribe button to every email, so recipients can opt out of future emails.
SMS settings
- Sender Name is the name shown as the sender of your SMS, for example
Acme Inc.. A custom SMS sender name does not apply for North America with the country code +1 and New Zealand with +64. You need the legal permission or authorization to use this sender name.
Without an SMS sender name you cannot send SMS. Sendouts and bulk processing show a corresponding warning until you configure one.
Sending from your own email address with White Label Mail
If you want to send your emails from your own email address and domain instead of a Passcreator address, book the White Label Mail additional service. You find it in the profile menu under Subscription › Additional Services. Or you contact Passcreator. The setup involves four steps.
- Tell Passcreator the email address you'd like to use. Passcreator enables the address at its email service provider Mailjet. You'll then receive an email from Mailjet with a confirmation link at that address. Passcreator needs this link to send emails in your name. The easiest option is to forward the email to Passcreator support.
- Set up SPF. SPF, the Sender Policy Framework, is a DNS entry that tells receiving mail servers which servers send emails for your domain. Add the following to the SPF record of your domain. ``` v=spf1 include:spf.mailjet.com include:bnc3.passcreator.com ?all ```
- Set up DKIM. DKIM, short for DomainKeys, publishes a public key so receivers can verify that the email really comes from an authorized sender. Create a TXT record named
mailjet._domainkey.yourdomain.comwith the key Passcreator sends you after you have confirmed the address. The value looks like this. ``` k=rsa; p=123456789agarewgaer89g47ag63a4rgareg... ``` - Final check. Passcreator verifies everything and enables the address for your account. From then on, all emails you send leave from your own sender address.
Confirming the address alone is enough to send from it. Passcreator strongly recommends the SPF and DKIM records anyway, so your emails don't end up in spam folders.
Using your own SMTP server
If you prefer to deliver emails entirely through your own infrastructure, connect your own SMTP server. This requires the custom SMTP add on. When the add on is active, an Own SMTP server section appears in the email settings.
- Enable the Use own SMTP server toggle.
- Fill in SMTP Host, SMTP Port from 1 to 65535, Username and Password.
- Choose the Encryption, either TLS, SSL or None. Optionally set From Address, From Name and
Reply-to Email Address. - Click Test Connection to check your configuration. The result reads "SMTP connection successful" or "SMTP connection failed. Please check your settings."
- Click Save SMTP Settings.
Next step
Continue withSendouts by email or SMSChecked 2026-08-20 · Documentation